The useing of protocol in Electron
04 Nov 2016Electron 的 protocol 接口使用介绍
1. protocol 初步阅览
应用程序中点击 a 标签,默认都是在当前窗口打开链接。现利用 protocol 注册一个协议,实现,使用该协议的链接,统一使用外部浏览器打开。
程序目录结构如下
paul-demo/
├── public
│   └── icon.png(程序图标)
├── package.json
├── main.js
└── index.html
package.json 文件内容如下
{
    "name": "paul-demo",
    "productName": "paul",
    "main": "main.js",
    "version": "1.0.1",

    "devDependencies": {
        "electron": "^1.4.1"
    }
}
main.js 文件内容如下
const electron = require('electron');
const app = electron.app;
const BrowserWindow = electron.BrowserWindow;
const shell = electron.shell;
const nativeImage = electron.nativeImage;

/* 初始化 */
app.on('ready', () => {
    createWindow();
    localProtocol();
});


/* 创建主窗口 */
function createWindow()
{
    var image = nativeImage.createFromPath('./public/icon.png');

    var options = {
        width: 350,
        height: 250,
        closable: true,
        icon: image
    };

    mainWindow = new BrowserWindow(options);

    mainWindow.loadURL(`file://${__dirname}/index.html`);

    mainWindow.on('closed', () => {mainWindow = null});
}

/* 注册自定义协议 */
function localProtocol()
{
    protocol.registerStringProtocol('paul', (request, callback) => {
        var url = request.url.replace('paul://', 'http://');
        shell.openExternal(url);    // 打开链接
    }, (error) => {
        if (error) console.log('register protocol fail');
    });
}
index.html 文件内容如下(注意 a 标签里面的地址)
<!DOCTYPE html>
<html>
<head>
    <title>Demo Version 1.0.1</title>
</head>
<body>
    <h1 style="text-align: center;">Protocol</h1>
    <div style="text-align: center;">
    <a href="paul://www.example.com">Hello, World</a>
    </div>
</body>
</html>
在 paul-demo 目录下,命令行运行 electron . 启动程序。实际效果如下
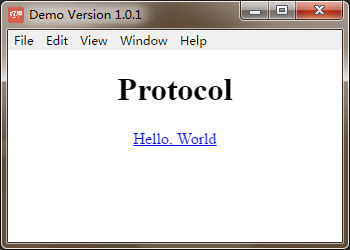
点击上图的 Hello, World 将在外部浏览器中打开链接
以上为 protocol 的初步应用
2. 使用 protocol 实现一个调度转发器
程序目录结构如下
paul-demo/
├── public
│   └── icon.png(程序图标)
├── module
│   ├── controllers
│   │   └── demo.js
│   └── views
│       └── index.html
├── package.json
├── main.js
└── index.html
main.js 文件内容如下
const electron = require('electron');
const app = electron.app;
const BrowserWindow = electron.BrowserWindow;
const protocol = electron.protocol;
const nativeImage = electron.nativeImage;


/* 初始化 */
app.on('ready', () => {
    createWindow();
    dispatcher();
});


/* 创建主窗口 */
function createWindow()
{
    var image = nativeImage.createFromPath('./public/icon.png');

    var options = {
        width: 350,
        height: 250,
        closable: true,
        icon: image
    };

    mainWindow = new BrowserWindow(options);

    mainWindow.loadURL(`file://${__dirname}/index.html`);

    mainWindow.on('closed', () => {win = null});
}

/**
 * 注册调度器
 * "dispatcher://controller/action"
 * 这种格式的 protocol 将通过此调度器转发
 */
function dispatcher()
{
    protocol.registerStringProtocol('dispatcher', (request, callback) => {
        /* 获取路由 */
        var route = request.url.substr('dispatcher://'.length);

        /* 解析路由 */
        var [controller, action, ...argument] = route.split('/');

        var instance = require(`./module/controllers/${controller}`);

        /* 执行 action */
        var result = instance.run(action, argument);

        callback(result.toString());

    }, (error) => {
        if (error) console.log('register protocol fail');
    });
}
index.html 文件内容如下(注意 a 标签里面的地址)
<!DOCTYPE html>
<html>
<head>
    <title>Demo Version 1.0.1</title>
</head>
<body>
    <h1 style="text-align: center;">Protocol</h1>
    <div style="text-align: center;">
    <a href="dispatcher://demo/index">dispatcher</a>
    </div>
</body>
</html>
module/controllers/demo.js 文件内容下
/**
 * 控制器构造方法
 */
function Demo(action, ...arguments)
{
    this.view = `${__dirname}/../views/${action}.html`,

    this[action] = () => {
        return this.render();
    },

    this.render = () => {
        return 'Hello, Dispatcher.';
    }
}

/**
 * 使用 Node.js 的模块导出(module exports)
 * 详情参见 https://nodejs.org/api/modules.html#modules_modules
 */
exports.run = (action, ...arguments) => {
    var controller = new Demo(action, arguments);
    return controller[action]();
};
在 paul-demo 目录下,命令行运行 electron . 启动程序。实际效果如下
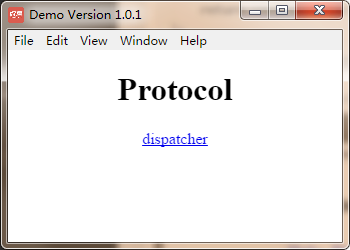
点击上图的 dispatcher 效果如下图
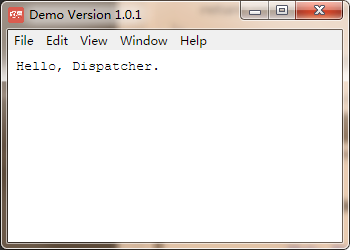
以上是用 protocol 接口实现一个调度转发器实例
3. 下一阶段目标
查找使用 Electron 实现的应用程序源码,并思考 Electron 各种接口的应用场景。
4. 结束语
由于本人水平有限。以上如果有理解不透彻,有偏差或者甚至是完全错误的地方,还请不吝指正。
参考资料:
[1] Electron Documentation
[2] Node.js Modules
[3] https://discuss.atom.io/t/custom-application-protocol-my-app/21966
[4] http://stackoverflow.com/questions/18534591/how-to-register-a-url-protocol-handler-in-node-js